AWS IAM with SPIFFE & SPIRE
Recently I’ve been working on some material around workload identity and authentication in Kubernetes. SPIFFE and SPIRE are two really interesting projects in this area. SPIFFE (Secure Production Identity Framework For Everyone) is a standard spec defining a workload identifier (SPIFFE ID) that can be encoded into a SPIFFE Verifiable Identity Document (SVID), either in the form of x509 or JWT. The spec also defines a few APIs that must be satisfied in order to register nodes and workloads etc… SPIRE (SPIFFE Runtime Environment) is the reference implementation of the SPIRE spec.
A longer-form introduction to the projects is out-of-scope here but check out this great video by Andrew Jessup to learn more.
In this post I’m going to walk through configuring SPIFFE & SPIRE to provide fine-grained identity to Kubernetes pods that allow them access to AWS IAM roles. You may already be familiar with existing projects like kiam or kube2iam (which both contain fairly serious security issues) and try to achieve the same thing. The model for both of these tools is to proxy the EC2 metadata API and return AWS credentials as appropriate. The scope of access is defined by labels on the pod spec.
AWS also recently released an approach called IRSA (IAM Roles for Service Accounts) that achieves the same thing (without the security issues) but with a totally different approach. IRSA uses IAM OIDC federation and lets pods authenticate to AWS using a service account token. The model is much cleaner, but unfortunately it requires a little hackery (which will be going away soon) and can be a little cumbersome to setup. The scope of access is a defined by the service account assigned to the pod.
In my opinion SPIFFE provides a nicer way of thinking about workload identity with more granular scope, is cross-platform, and recently added some support for OIDC discovery, so let’s try and make it work with AWS!
Installing and Configuring SPIRE
All of the resources in this article are online @ GitHub
Installing SPIRE is fairly straightforward using the quickstart on the homepage. There are a couple of things we have to modify though. In the server-configmap.yaml file we need to add:
ca_key_type = "rsa-2048"                    // AWS doesn't support elliptic curve keys yet
jwt_issuer = "https://spire.example.com"   // Add the URL that our OIDC provider will be available on
After following the guide, we should have a server running with a daemonset of registered agents. The SPIRE OIDC discovery provider comes with built-in capability to register and fetch an ACME (LetsEncrypt) certificate (as OIDC discovery endpoints must be HTTPS). However I’d rather manage my own certificates with cert-manager so I used the guide for Contour and cert-manager to configure ingress and automatic certificate issuance.
Now that’s setup, let’s actually register our OIDC discovery component as a workload in SPIRE, and deploy it to the cluster.
$ kubectl exec -n spire spire-server-0 -- \
    /opt/spire/bin/spire-server entry create \
    -spiffeID spiffe://example.com/oidc-discovery \
    -parentID spiffe://example.com/ns/spire/sa/spire-agent \
    -selector k8s:ns:spire \
    -selector k8s:sa:spire-oidc-discovery-provider
The above registers the OIDC discovery component as a workload with SPIRE. Next we can deploy the oidc-config.yaml:
...
domain = "spire.example.com"                        // The same as my issuer
insecure_addr = "0.0.0.0:9090"                      // Where the OIDC server should listen
workload_api {
  socket_path = "/run/spire/sockets/agent.sock"     // Socket of the SPIRE Agent
  trust_domain = "example.com"                      // Trust domain
}
...
Now we can add the oidc-account.yaml, oidc-service.yaml, oidc-ingress.yaml and oidc-deployment.yaml objects to the cluster. Once everything is up and running visit https://spire.example.com/.well-known/openid-configuration and check the discovery document is being served correctly.
Configure AWS
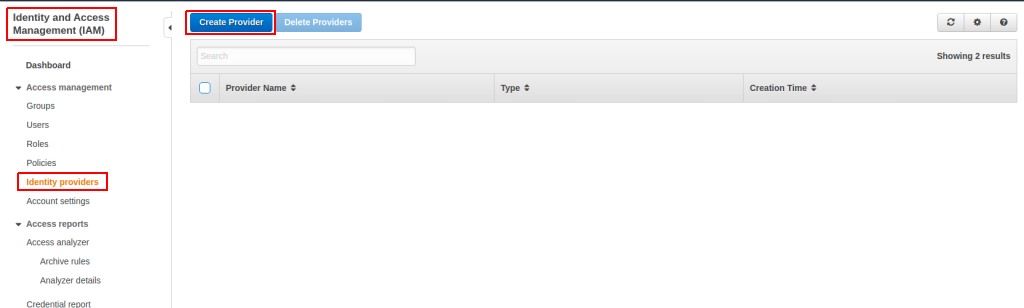
Now we need to configure AWS to use our SPIRE OIDC provider to validate tokens. Login to your AWS account and navigate to IAM. Click through to create an OIDC identity provider:
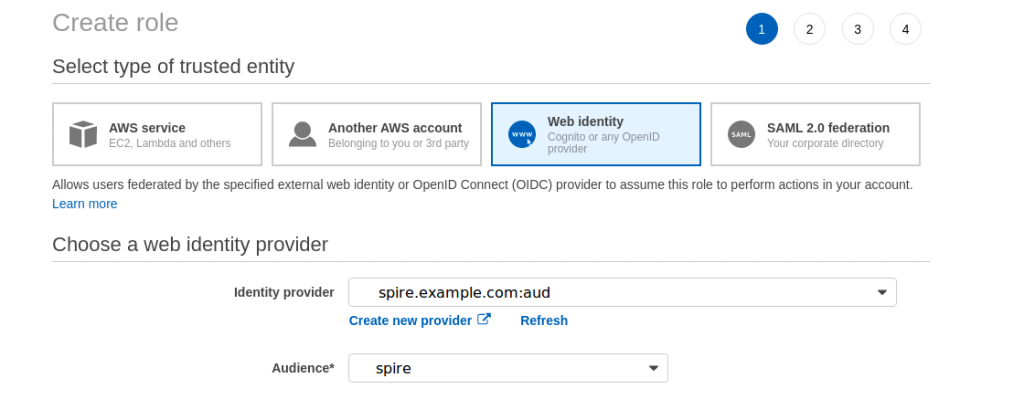
Configure the provider with the issuer URL of our SPIRE server and the audience:

Now we’re going to create a role for our web identity. Click through to create a new role in IAM and attach the S3 Full Access policy:
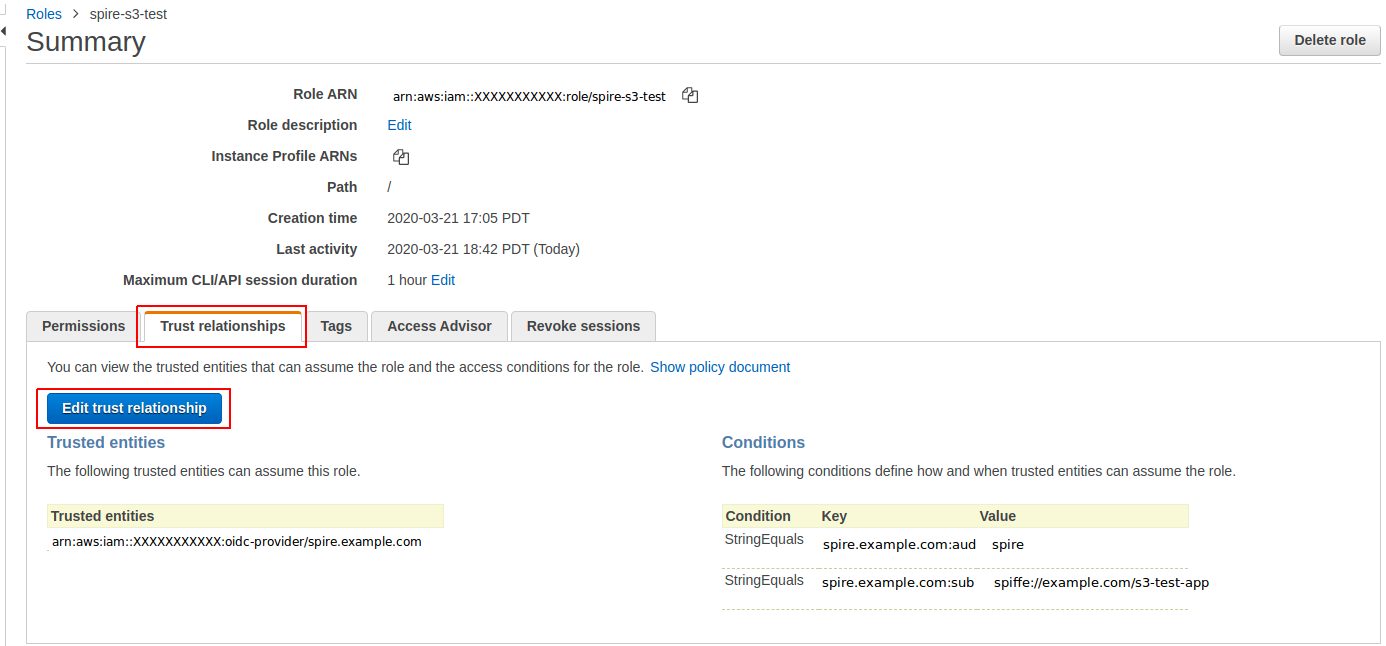
Once the role is created, we need to edit it to create a trust relationship for our SPIFFE ID workloads to use it. Click the role, then hit “Trust Relationships” and “Edit trust relationship”:
Add a new line to the StringEquals condition with the :sub property set to the SPIFFE ID of the workload that we want to authorize to use the role:
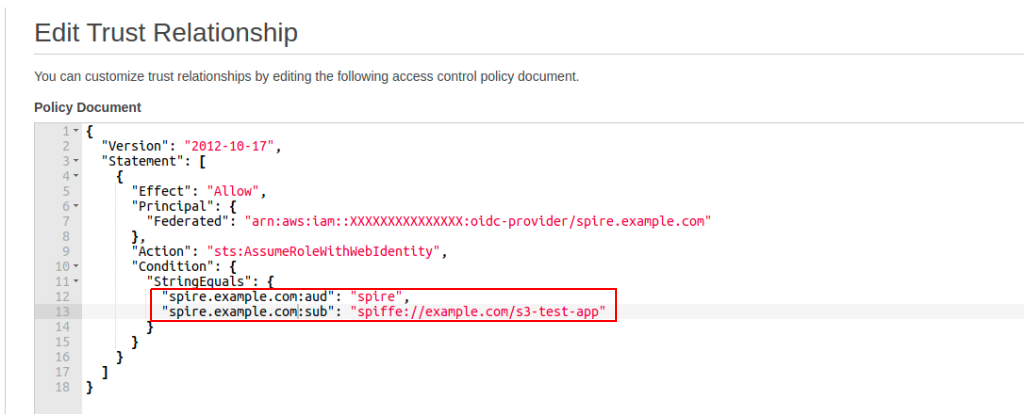
Now we have successfully setup AWS to verify our SPIFFE ID JWT tokens and grant access to the created role for our example workload. Let’s test it!
Test a workload
Now that we have the pieces in place, let’s actually test to see if we can access our AWS role from a dummy workload. Firstly we’ll register the workload with the SPIFFE ID we set in the Trusted Policy:
$ kubectl exec -n spire spire-server-0 -- \
    /opt/spire/bin/spire-server entry create \
    -spiffeID spiffe://example.com/s3-test-app \
    -parentID spiffe://example.com/ns/spire/sa/spire-agent \
    -selector k8s:ns:default \
    -selector k8s:sa:s3-test-sa
Now we can deploy a pod that just sleeps so we can exec in and play around. After installing the aws-cli and spire-agent (this is just so we can use it as an API client, it’s not ordinarily required) in the pod, let’s make a call to the SPIRE workload API to get our identifying JWT-SVID:
./spire-agent api fetch jwt --audience spire -socketPath /run/spire/sockets/agent.sockNow we can copy the JWT and use it in an AWS STS call:
aws sts assume-role-with-web-identity --role-arn arn:aws:iam::XXXXXXXXXXX:role/spire-s3-test --role-session-name <AUDIENCE> --web-identity-token <JWT_TOKEN>Finally, I can use the credentials (AWS_ACCESS_KEY_ID, AWS_SECRET_ACCESS_KEY and AWS_SESSION_TOKEN) returned to push a test file to S3:
$ export AWS_ACCESS_KEY_ID=XXXXXXXXXXXXXXXXX
$ export AWS_SECRET_ACCESS_KEY=XXXXXXXXXXXXXXXXXXXXX
$ export AWS_SESSION_TOKEN=XXXXXXXXXXXXXXXXXXXXXXXXX
$ echo test > test.txt
$ aws s3 cp test.txt s3://my-example-bucket
Improvements
I really like this flow as it gives a super granular way and secure way for workloads (even down to the individual container) to access AWS services. However there are a couple of rough edges right now.
SPIRE has a helper tool that will sit as a sidecar to applications and automatically retrieve updated SVIDs for consumption by an application. That’s nice because our application doesn’t have to be SPIFFE aware, unfortunately it doesn’t support JWTs right now. The SPIRE team are rewriting the SPIRE API code and that issue should be resolved once the work is finished.
SPIRE has a generally unsolved problem (although there is an attempt here) around registering workloads. The operator idea seems like the way to go here and I’ll be watching / contributing as I can. However it’s something to bear in mind.
Other Resources
- Joe Beda did a TGIK on SPIFFE / SPIRE
- SPIFFE / SPIRE Slack
- SPIFFE / SPIRE Twitter
I hope this has been a useful guide to setting up SPIFFE / SPIRE for pod authentication to AWS IAM from a Kubernetes cluster. Feel free to share using the button below and contact me on Twitter if you have questions or comments on this post or suggestions for future posts!
